
A new window will open, this is the distribution list management window where you can add or remove members on the list and use it to send emails and schedule meetings.
There are two methods for adding someone to the list. The first method shown is for someone who is not a University employee and is not in Exchange. To add such a person begin by clicking the 'Add New' button.
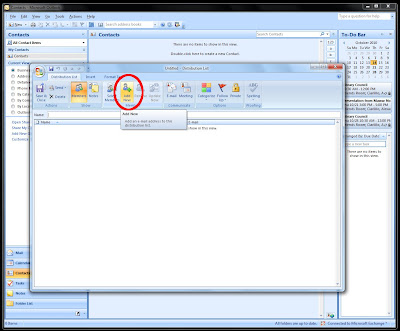


You will be presented with a box where you will enter the person's email address and the name you would like to be displayed for them. Fill out this information and if this person is not already in your contacts as an individual, and you would like to add them, check the box for 'Add to contacts'. Click 'OK'.

You should now see the first person show up on your distribution list.
For the next example we will add someone who is in Exchange. To start, click 'Select Member'.

Now you will be shown the Global Address Book. To narrow your search, start typing in the person name. Once you see their name, double click on it.

After double clicking on their name, it will be added to the box along the bottom of this window. From here you can continue adding members to the group. Each one you add will be displayed across the bottom separated by a semicolon.

Once you have added your members, you must give your distribution list a name. Once you have entered the name, press the 'Save & Close' button to save the changes you have made.

To make use of the distribution list, start from the Contacts screen and double click on the group you would like to manage.

From here you will see the management window as before. Again, you can add and remove members here, but in this case we will just send an email without making any changes. Click the 'Email' button. From this point it is just like sending a regular email. For scheduling meetings it is the same process, just using the 'Meeting' button instead.

No comments:
Post a Comment