Monday, April 18, 2011

Topic 21: Saving RSS Feeds to Outlook

The Outlook email program allows you to save RSS feeds there just as you would email. There are two methods for doing this (Note: some people have had trouble with the first method).  Here's how:

Method 1 
1.  Go to a blog or web page for which you want to get updates in Outlook, such as the OU Libraries Strategic Planning Blog

2.  Click the orange RSS feed button in the URL address bar.  If a drop-down menu appears, select "Subscribe to > Planning Blog > RSS feed".  If no drop-down menu appears, just go to Step 3.

3. Make sure the next window says "Subscribe to this feed using Microsoft Outlook" (you might have to change the drop-down choice to say this) and click "Subscribe Now". You will get a pop-up box that says "Add this feed using Outlook?" Click Yes. A new Outlook window should open displaying the feed.

Method 2

1.  Go to a blog or web page for which you want to get updates in Outlook, such as the New York Times.

2.  Click the orange RSS feed button in the URL address bar.  If the URL changes from the home page URL, such as http://www.nytimes.com/ to the website's Feed URL, such as http://feeds.nytimes.com/nyt/rss/HomePage, highlight it and use Cntrol + C to copy it.

3.  Go to your Outlook email.  Click the "File" tab and then "Account Settings." From the drop-down menu choose "Account Settings" again.

4. In the window that opens, click the "RSS Feeds" tab and then click the "New" link underneath that.  In the pop-up box, paste the URL you copied using Cntrol + V.  Click the "Add" button.


5.  Click "OK" in the next box that opens and click "Close" to close the RSS Feeds box.

6.  Look in the RSS feeds section of Outlook, and you should see that the blog has been added. Click on it to read the latest posts.


You will have to go in and click on the RSS feeds that you want to read. They will automatically update with the newest posts. You will see a number next to the blog title if there is anything new there since the last time you checked.

Sunday, April 17, 2011

Topic 20: Setting your Browser Window to Full Screen

Sometimes you may want to view a web page in "full screen" mode without all of the toolbars at the top of the browser window showing.  You can do it just with the push of the F11 button.  Here's how:

Open a regular Internet Explorer browser window:


Now push the F11 button on your keyboard.  Your window should now look something like the window pictured below, with no toolbars at the top (in blue):


Now push the F11 button again. This should restore your blue toolbars at the top of the window:


NOTE: If you use the Firefox browser instead of Internet Explorer, everything should work the same.

Saturday, April 16, 2011

Topic 19: Forwarding an Email as an Attachment

Sometimes you may want to forward an email to someone as an "attachment." How is this different from just forwarding an email the regular way?

For standard email  forwarding, you just click the "Forward" button at the top of your email window, put in the email address of who you are sending it to, click "Send" and you're done.

Forwarding an email as an attachment is still forwarding an email to someone, but instead of the email being sent as a regular email, it is placed into a separate document that is attached to a blank email.

There are just two steps:

1.  Instead of clicking the "Forward" button, click the drop-down menu to the right of it that says "More" and then choose "Forward as Attachment." 

2.  Put in the email address of the person you are sending it to (writing an explanatory message is optional), click "Send" and that's it!

Why would you go to this trouble?  Forwarding an email as an attachment sends a clean copy of that original email to someone, without your email signature in the way (what happens when you forward an email by the regular method).  This would be useful for occasions when you know the person you are forwarding the email to is going to print it out for record keeping (an example would be a receipt that you receive as an email that you need to forward to finance).

Friday, April 15, 2011

Topic 18: Using Advanced Search Techniques in Google Search

Advanced searching in Google is useful at those times when you want something more specific that what the basic search is giving you. It’s helpful, though to remember a few things about Google searching in general. Keep these things in mind:
  •  Keep it simple. If you're looking for a particular library, just enter its name, or as much of its name as you can recall. Most queries do not require advanced operators or unusual syntax. Simple is good. 
  •  Think how the page you are looking for will be written. A search engine is not a human, it is a program that matches the words you give to pages on the web. Use the words that are most likely to appear on the page.
  •  Describe what you need with as few terms as possible. The goal of each word in a query is to focus it further. 
  • Choose descriptive words. The more unique the word is the more likely you are to get relevant results. Nondescript words like 'document,' 'website,' 'company,' or 'info,' are usually not needed.
This being said, there are a few advanced techniques that are helpful in finding more specific information.

Phrase search ("")
By putting double quotes around a set of words, you are telling Google to consider the exact words in that exact order without any change. 


Searching for “global climate change” will focus your results.


Search within a specific website (site:)
Google allows you to specify that your search results must come from a given website. For example, the query [ Andrew Stuart  site:ohio ] will return pages about Andrew Stuart but only from Ohio sites You can also specify a whole class of sites, for example [ ohio university  site:.gov ] will return results only from a .gov domain and [ ohio university  site:.uk ] will return results only from British sites.

 
Fill in the blanks (*)
The *, or wildcard, is a little-known feature that can be very powerful. If you include * within a query, it tells Google to try to treat the star as a placeholder for any unknown term(s) and then find the best matches. For example, the search [ Google * ] will give you results about many of Google's products (go to next page and next page -- we have many products). The query [ Battle of * Run ] will give you stories about different battles along different streams. . Note that the * operator works only on whole words, not parts of words.


The OR operator 
Google's default behavior is to consider all the words in a search. If you want to specifically allow either one of several words, you can use the OR operator (note that you have to type 'OR' in ALL CAPS). For example, [ Cats movie OR play ] will give you results about either one of these, whereas [ Cats movie play ] (without the OR) will show pages that include both . The symbol | can be substituted for OR. (The AND operator, by the way, is the default, so it is not needed.)


 Finally, if you don’t want to remember these techniques you can use the Advances Search interface which allows you to just fill in the blanks.


Your task for Tech Tag is to try some of these searches on a topic of your choice and see what you come up with.

Thursday, April 14, 2011

Topic 17: Accessing Library Videos

It's so easy to access library videos, and of course so much fun!  One easy way to access videos is to click "Tutorials" in the middle of the library homepage.

 
You'll be taken to a tutorials page where you can explore and click what you want to view, and then view it within the page.


Also, another fun option for library videos is the library YouTube page (www.youtube.com/aldenlibrary), also accessible via the Facebook page (facebook.com/aldenlibrary).


To complete this task you'll need to watch 2 library videos, list the ones you watched under "Comments" and then say what you liked about 1 of them.

Wednesday, April 13, 2011

Topic 16: Creating a Slideshow for the Plasma Screens

Creating a slideshow for display on the plasma screen is easy and only takes a couple of changes made within PowerPoint.  First, let's open a PowerPoint presentation and click the design tab.


From there, click the "Page Setup" button on the far left of the screen.  This will give some options that need manipulated in PowerPoint.  The first manipulation is to change the on-screen size to 16x9.  After saying OK to this, move to the "Slide Show" tab and click "Set Up Slide Show."


 The goal here is to set the slideshow to a continuous loop.  This button box is in the middle of the page.  Slide to check the box next to "Loop Continuously" and then click "OK."


Finally, under the "Transitions" tab click the bubble in the bottom right corner of the ribbon next to "After" and place within 5 -8 seconds within this box.  This is how often the slide will remain on the screen before switching to the next.  This is depends on preference of the person making the slideshow.

The last thing you need to do after creating the show is to save it.  It needs to be saved in the S drive following these folders - PLASMA PRODUCTIONS  - TITLE YOU WISH.


To complete this task create a 3 slide PowerPoint that follows the rules of plasma slide show creation.  Make it something fun you can share with others.

Tuesday, April 12, 2011

Topic 15: Resizing a Photo

As we did with cropping a photo, well explore resizing a photo in two different programs (MS Office and MS Paint).  We'll again use right clicking - open with to open in each program.  Be sure to have a photo ready to try the exercise.  Let's start with MS Office.  Above the picture you'll click "Edit" and that will bring some editing options up on the side.


By clicking resize you'll be presented with some options for resizing your photo.  You can choose custom, predefined and percentage.  For this exercise we'll try percentage.  Click the bubble next to the box making that box active, then insert 30 and click "OK" underneath.  The image has now been resized to 30 percent of it's original.


In Paint the technique is similar, but you'll see differences off the bat, as the picture doesn't automatically fit the screen.  This will show you the great contrast in size that truly happens with a 30% resize.  Click resize at the top of the page and options for resizing will appear.  You'll notice that the top of the pop-up box says percentage and it locks one height or width in when the other number is entered (i.e. you only have to add 30 into one box).  Go ahead and add 30 into a box and click "OK."  That's it, that image has been resized!


For this task, please download this picture and resize it to 30% of its original.

Monday, April 11, 2011

Topic 14: Cropping a Photo

We'll take a look at two different techniques for cropping a photo in this post.  The first being cropping within MS  Office 2010, and the other within MS Paint.  Either way, we'll open the photo first by right clicking - selecting "Open With" - and then the program desired.  To start we'll look at MS Office 2010.

Once you open with MS Office 2010 you'll have a screen with your image and a button over the top that says "Edit Pictures."  Click that button to get started with tools for cropping.


Now that "Edit Pictures" has been selected you'll have the tools for manipulating the pictures on your right hand side.  Click "Crop" and you'll be given a picture box where you can click and drag corners to the area you desire.


Once you've got what you want within the box click "OK" and you'll have a finished product ready to save.


A picture opened in Paint looks like the image below.  To start cropping in Paint, simply click the "Select" box at the top of the page and choose what kind of shape you want your selection to be.  We'll start with a simple rectangle.


After choosing what shape you need, highlight the area desired for the picture.


Highlighting an area will automatically give you the option to crop (located next to the selection area).  Click crop and your image will now only encompass what was within the selection.  That's it for cropping!


For this task, download this picture and crop the sides out, leaving only the castle in the picture.

Sunday, April 10, 2011

Topic 13: Searching and Improving the Wiki

Sometimes it can be hard to find things on the Wiki. This is because the Wiki generally only does a basic text search of page content and titles. It is nowhere near as powerful as something like Google. We can alleviate this however by fixing our pages and searches to better match our expectations.
In general, this is done by redirecting one page to another. This is useful in that if someone searches for the page “Login Errors” (which does not exist), we can then create this page and redirect it to “Login Problems” (or whatever the page title may be). Now in the future when someone searches for “Login Errors” they will still get to where they expected to go.
We will reproduce the above example here:
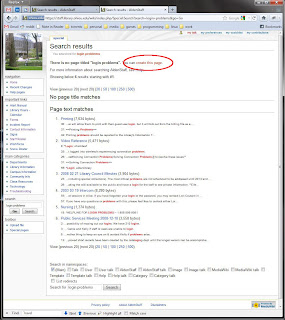
Step 1) Identify a problematic search. In this case “Login Issues”


Step 2) As in the previous tech-tip for creating a page, click the “create this page” button. You will once again be shown a blank page for editing.
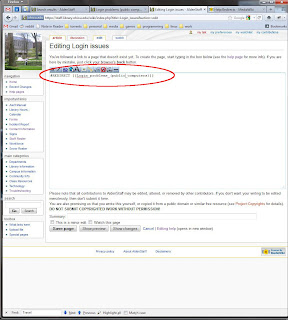
Step 3) Add the following text to the page:
#REDIRECT [[page_name]]
(replace page_name with the actual name of the page) See below.


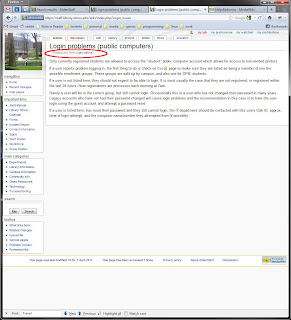
Step 4) Save the page. You will see the new page created with a link to the redirected page. In the future you will not see this link, the redirection will happen automatically and fill your page with the other content.
Step 5) Repeat your troublesome search and see the new results. (Note in the image below, beneath the article title, it also shows where this was redirected from.)


To complete this tech task, create a redirection for a search you often find troublesome.

Saturday, April 9, 2011

Topic 12: Adding to the Wiki

Wiki’s are only as useful as their community. Wikipedia, for instance, can be such a vast and impressive resource because it has such a huge community of users who are always striving to make it better. As with most things in life, when it comes to Wikis, you only get out what you put into it.
In this tech-tip item you will see how you can quickly generate your own Wiki content in order to help yourself and others quickly get access to useful information. In this example I will be creating a page related to use login issues on the public computers.
Step 1) Open your browser and head to the wiki: https://staff.library.ohiou.edu
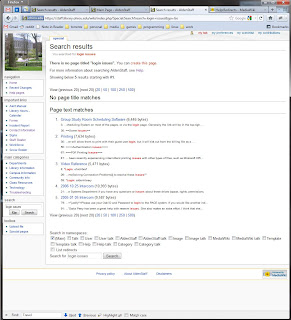
Step 2) Do a quick search and make sure a page does not already exist for this topic.

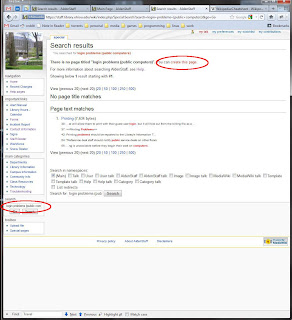
Step 3) We can see no page exists with this title and the wiki even gives the option to instantly create the page we were looking for near the top of the page (circled in red). However, I would like my page title to be a bit more descriptive, so I will repeat my search with the page title I really want.

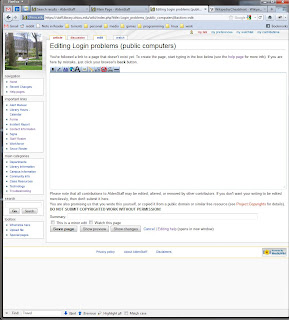
Step 4) Now we will follow the “create this page” link (circled above) and we will be greeted with our new, blank page.


Step 5) From here you simply type in your content. For just entering plain text there should be no special formatting required. To simply make text bold or italic, or add links to other web sites and pages, just use the edit bar across the top. For more complex formatting requirements, refer to http://en.wikipedia.org/wiki/Wikipedia:Cheatsheet.


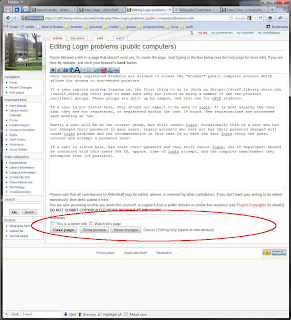
Step 6) Below your edit area are a few extended options for the new page. You have the option to add a summary telling others what this page is for and to help when people search for it which is highly recommended. You can also select to “Watch this page” if you would like to receive emails when/if the page is modified by someone else. Refer to the area circled above.
Step 7) Save your new page. Click the “Save page” button and you will be directed to your newly added wiki page!
To complete this tech-tag task create your own wiki page. It can be for anything you want, you always have the option to delete it later.