Friday, April 8, 2011

Topic 11: Zipping and Unzipping Files

Sometimes when you want to send someone multiple files at once, it is easier to create what is called a "Compressed Folder" or "Zip Archive" of these files and send it instead. The advantages of this are two-fold. One, all of the files are consolidated into just one file you need to send. Two, the file size will usually end up being slightly smaller than all of the other files combined. This is where the "compression" comes in.

Here I will show an example of doing this with a set of images that I could then later email to someone.

Zipping/Compressing

Step 1) Open the folder of images or files you want to work with.


Step 2) There are 2 ways to proceed from here. You can either click-drag to select all of the files you want to include, or you can simply select the folder containing these files. The end result will be generally the same and both methods are depicted below. Once you have selected all your images, right click and navigate to "Send To" -> "Compressed (zipped) folder" as circled below.


Step 3) You will see that a new file has been created and is ready for you to rename it. Once you have renamed the file, that's it! Now you can use this file to send these documents as one complete bundle. Read on to learn how to "extract" or "unzip" this new file.


Unzipping/Extracting

Step 1) Right click on the archived file and select "Extract All..." as circled below.


Step 2) You will then be prompted for a location where you want the include files to be placed. Usually you can leave the default for this step. Then simply click "Extract". You also have the option to have the new folder open automatically once it is extracted and this is set by default.


Step 3) Once the files are extracted, the time of which is dependent on how large and how many files are included, you will see the newly created folder displayed.


That is all there is to zipping and unzipping files. Again this can be extremely useful for sending many documents or especially large documents to people. But, as with most things on the internet, only accept zip archives from people you know and trust.

To complete this tech task, create a zip archive and extract it somewhere else on your computer.

Thursday, February 17, 2011

Idea Time


We need ideas!  We're gearing up for next quarter and need new Tech Tag activity ideas.  We're looking for anything technology related that you think would be beneficial for OU Libraries staff.  Just post your ideas as a comment under this post.  We'd like to have them in them by 3/3/11.

Monday, October 25, 2010

Topic 1: Google Docs


Google Docs provide a quick and easy way to create and edit documents and share them with others. For Tech-Tag, we have created a Google Docs spreadsheet where each person can keep track of what they have accomplished. This document has been setup so that only people with the link can view and edit the document. For this first task we will simply be opening the document and making a single change.

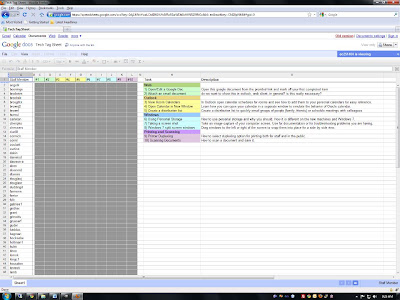
To open the document, simply click the link in the email which went out to announce Tech-Tag. Or, log in to the Wiki Page here and follow the link. The page will open in your usual Web browser and you will be presented with the following screen:

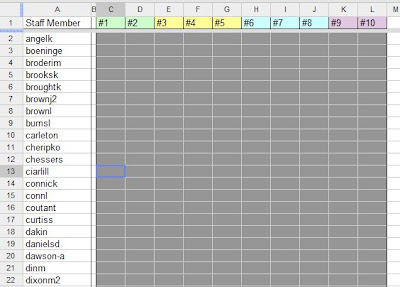
Now, with the document open, find your Oak ID along the side and select the first grey box as the image below shows.


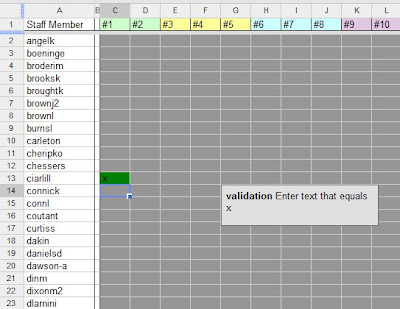
Now simply enter an ‘x’ in this box and hit ‘Enter’. The box should now be highlighted green, showing you have completed this activity. Your screen should look similar to the one below, with the possible exception that you will see more green boxes for activities others have completed.

The box you see above regarding 'validation' is simply a warning that the cell requires the letter 'x' to be entered, and will not accept anything else. For our purposes all we need is an 'x' to mark completion and this keeps unwanted text or information out of these cells.
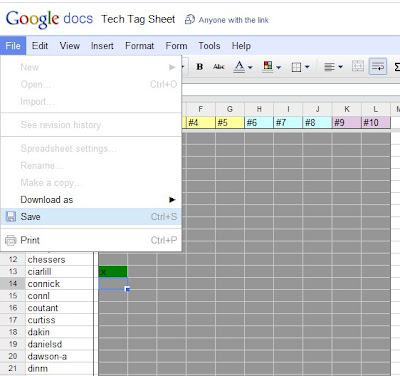
You can now close the window. With Google Docs there is no need to save the document before closing. It automatically saves whenever a change is made. However, if you would prefer to save it just to be sure, then before closing the window click the ‘File’ button in the top left hand corner, followed by ‘Save’ just as you would in Word or Excel.


That’s it! You have completed the first Tech Tag activity!

Sunday, October 24, 2010

Topic 2: Windows 7 Split Screen Windows

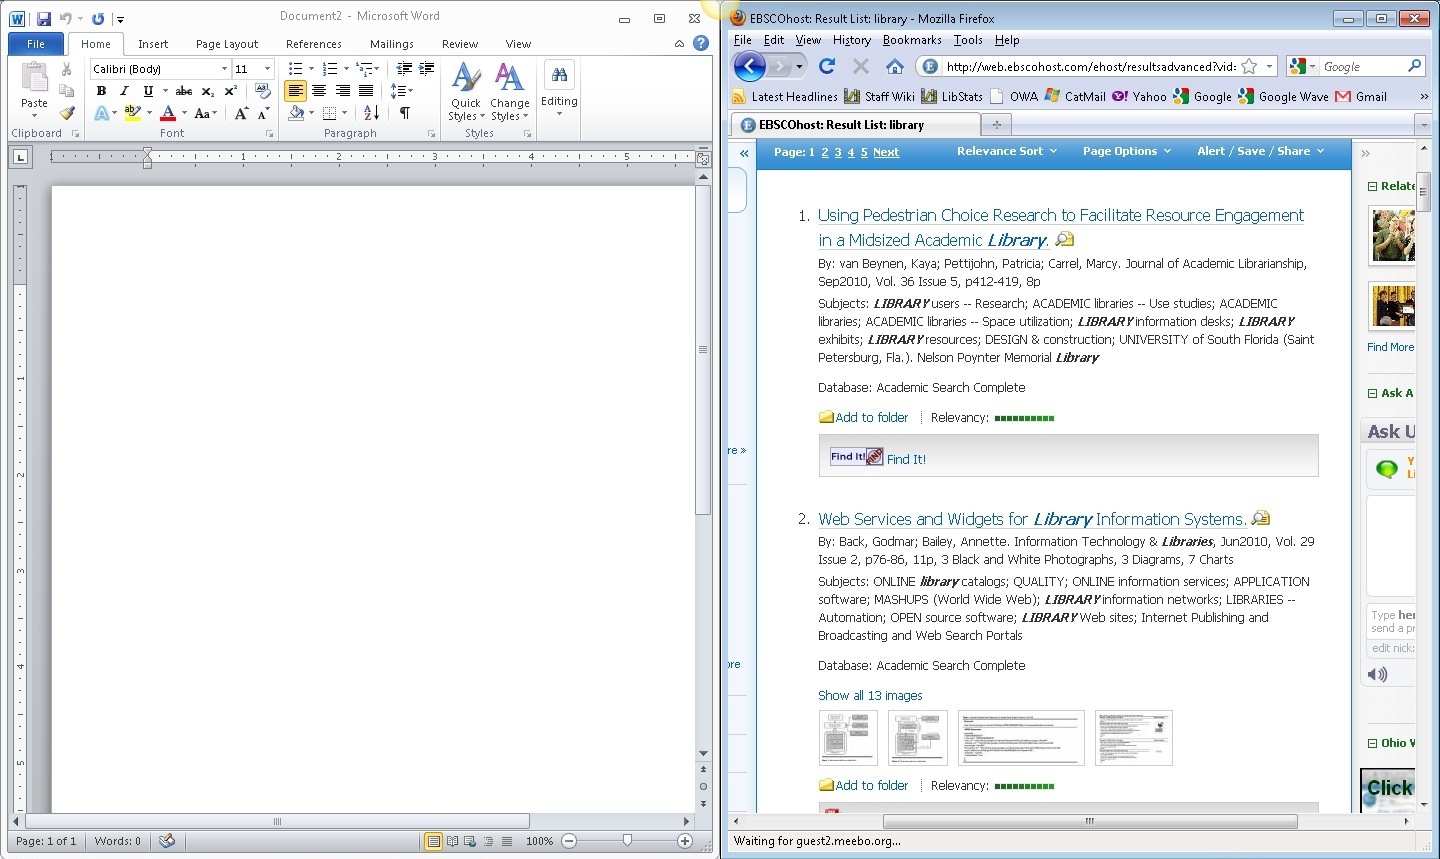
Windows 7 gives us the ability to “lock” windows into both sides of the screen, which in turn gives one the ability to view and navigate across two windows at once.  This is helpful for many reasons, with a library example being research on one side of the screen and writing on the other.  The following screen-shot shows one such example of Academic Search Complete and Microsoft Word going at once in split-screen.

 
There are two ways to achieve a split-screen view.  Both are fairly simple.  One option is to click the top bar of the window, hold, and drag the window to the desired side.  Split-screens can be achieved by doing this with both windows in opposite directions. The other option is to use the Windows key and a direction arrow.  For example, if it’s desired for the active window to be on the left side of the screen, one would press and hold the Windows key and then also on the left arrow.  The following screen shot shows what a window will look like when one has clicked, held, and started to drag toward a side.  Please note that you must drag the window all to the side you desire until is expands the length of the screen vertically.


By clicking, holding and dragging one screen to the left and one screen to the right the split screen is achieved.  The next screen shot shows a window just before it's locked in.  Notice that it takes up the entire length of the screen vertically.
After locking one screen to the right and one screen to the left, the final product is a locked split screen.


The other way of achieving a split screen is through keyboard commands.  The command is very easy to remember.  It's "Windows Key" + direction.  The Windows Key, which is second from the space bar in both directions should be held down while either left or right is pressed on the keyboard to move the active window onto that side.  The result is the same either way.


Topic 3: Attaching documents to email

In Outlook it is quite easy to attach documents to your emails.

From the regular email composition screen, click the "Attach File" button as highlighted below.


This will open the file browser window where you can search for and select the file you want to attach. Once you have found the file, click on it once so it is highlighted, then press the insert button.


Once you have pressed 'Insert' continue composing your mail as usual.


Saturday, October 23, 2010

Topic 4: Room Calendars

With the new Exchange system and Outlook you can view the schedules of all the rooms in the library. To see a room's availability, start by opening Outlook and going to your calendar. Once on this screen, click the 'Open a Shared Calendar' item on the left, as circled in the image below. Once you click this, a box will open for you to input the name of the room.


The easiest way to find the room you want is to click the button labeled 'Name'. You will then a see a new window with many people, rooms and other resources. To narrow this down to rooms, from the selection box below 'Address Book', select 'All Rooms'.

You should now see a list of the rooms available in Exchange, the libraries rooms are near the top and begin with 'Alden Library'. In this example I have selected the Friends Room.

Once you have made your selection, press 'OK' and the name will be filled in for the calendar you are trying to open like in the image below.

Press 'OK' once more and the calendar will be added to your list of available calendars for viewing. After you first select it, and depending on your Outlook configuration, you should see the calendar appear next to yours.

The calendar for this room will now always be available for you to see. To hide it when you do not need to use it, simply un-check the box next to where the calendar is listed, as circled in the image above.


Friday, October 22, 2010

Topic 5: Separate email and calendar windows

Some people are used to the old system of having their Calendar separate from their email. Here you will see how in Outlook you can get the same effect by opening the calendar portion in a different window from your email.

With Outlook open simply right click on the calendar button and select 'Open in new Window'.


You're calendar should now be open in a second window. Yes, it really is that easy!


Thursday, October 21, 2010

Topic 6: Creating and using a distribution lists

For this topic we will learn how to create and use personal distribution lists for sending emails and creating meetings in Outlook. To begin, open Outlook and open your contacts from the button on the left hand side. Your screen will probably have contacts in it and look slightly different than the one below. Right click somewhere in the middle area where the contacts are listed and select 'New Distribution List' as shown below.


A new window will open, this is the distribution list management window where you can add or remove members on the list and use it to send emails and schedule meetings.

There are two methods for adding someone to the list. The first method shown is for someone who is not a University employee and is not in Exchange. To add such a person begin by clicking the 'Add New' button.


You will be presented with a box where you will enter the person's email address and the name you would like to be displayed for them. Fill out this information and if this person is not already in your contacts as an individual, and you would like to add them, check the box for 'Add to contacts'. Click 'OK'.


You should now see the first person show up on your distribution list.

For the next example we will add someone who is in Exchange. To start, click 'Select Member'.


Now you will be shown the Global Address Book. To narrow your search, start typing in the person name. Once you see their name, double click on it.


After double clicking on their name, it will be added to the box along the bottom of this window. From here you can continue adding members to the group. Each one you add will be displayed across the bottom separated by a semicolon.


Once you have added your members, you must give your distribution list a name. Once you have entered the name, press the 'Save & Close' button to save the changes you have made.

To make use of the distribution list, start from the Contacts screen and double click on the group you would like to manage.

From here you will see the management window as before. Again, you can add and remove members here, but in this case we will just send an email without making any changes. Click the 'Email' button. From this point it is just like sending a regular email. For scheduling meetings it is the same process, just using the 'Meeting' button instead.


Distribution lists are a great way to simplify your workflow when you often send emails to the same groups of people. Gaining a familiarity with them will also help in the future as we make the move from our old mailing list system to Exchange groups.


Wednesday, October 20, 2010

Topic 7: Using Personal Storage

Before starting this exercise you'll need a document to work on.  You'll use this document from now on when you need a document for Tech Tag.  A Word Document is attached here.

Tech Tag Word Doc

First, choose "Open" when prompted by clicking the link.  Once the Word document opens in MS Word you can save to a convenient location of your choosing by click File - Save As as shown below.


What's listed below is the actual exercise for Topic 6.  Use the Word file you've just download to work through this activity.

Using personal storage on your desk PC is extremely easy with Windows 7.  The personal storage should be tied in automatically with your saving options on your PC.  So, let's take a look at saving a word file to your personal storage.  First, we'll start with the Word file.


Now, well save to the computer following the standard Save As - Documents.


I've chosen the file shown to be saved under the "Documents" folder on my computer under the "Libraries" heading.  Other than that I did not specify any particular path for the file.


The screen shot below shows a window opened on the right which is the "Documents" folder (where I just saved the file).  On the left hand side I have circled the home storage (personal storage through library).  I am going to click on the "Home Storage" and split the Windows.


The screen shot above shows that the file is saved in both "Documents'" folders, however, it must be noted that I solely specified the "Documents" folder on my computer for this save.  If this does not automatically happen for you, then there is an issue with the syncing.